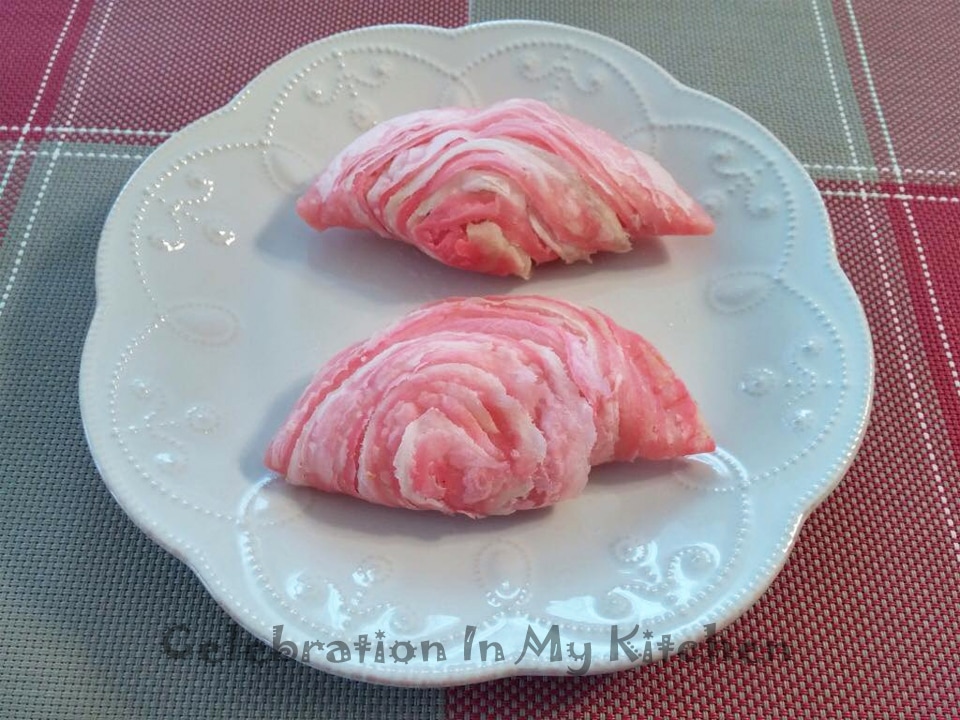
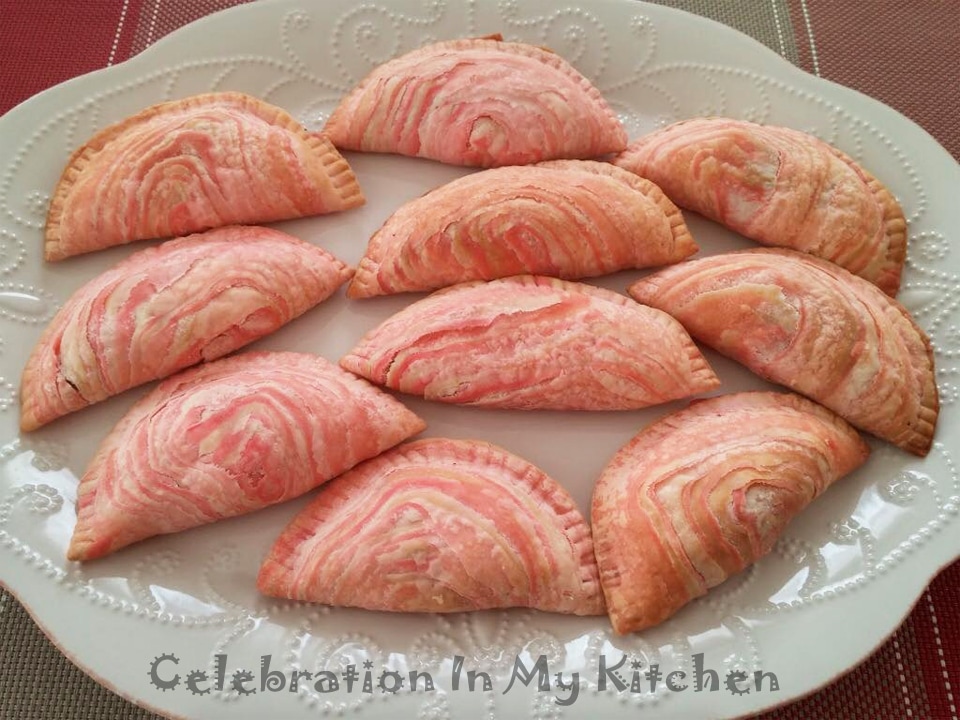
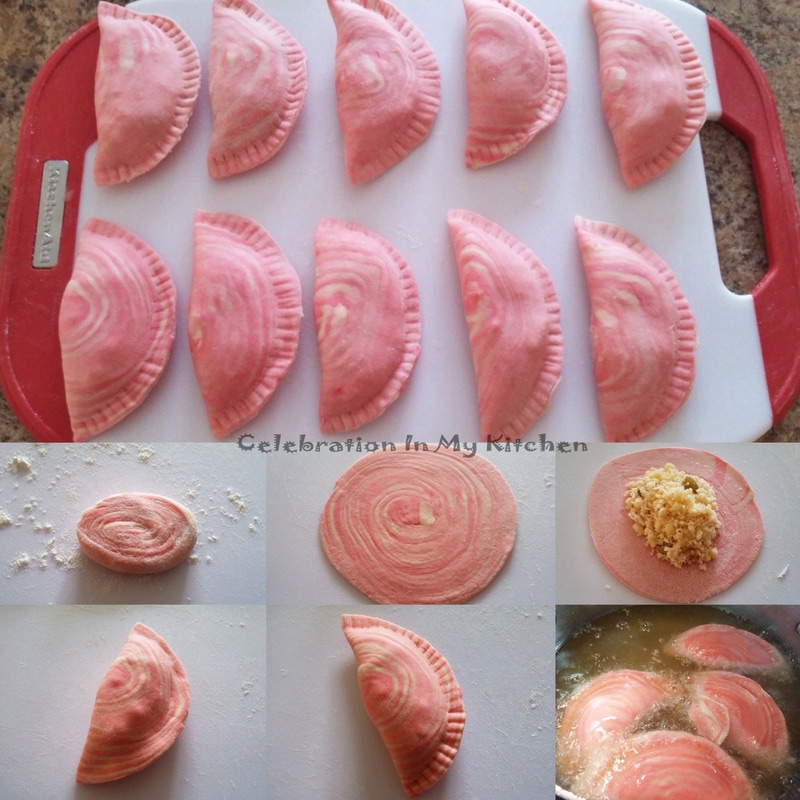
Holi popularly known as "the festival of colours" signifies the arrival of spring, end of winter, victory of good over evil, a celebration of love, fun and frolic. A common Holi and Diwali delicacy is mawa gujiya or karanji, which is a sweet dumpling with an outer crust prepared with white flour and semolina, stuffed with a filling of mawa, desiccated coconut, cashew nuts, raisins and cardamom powder. The colourful layered gujiyas though they require some extra effort are definitely worth it. They are deep fried on low heat to retain the colours and . A healthier alternative is to bake them at 400 F or 200 C for 15 to 20 minutes. Either way, they are appealing, eye-catching, sweet and irresistible.
Using good quality store-bought mawa speeds up the preparation process. Select mawa that is pale white, firm, without fungal growth or unusual smell. To make mawa at home, heat full-fat milk on medium heat until all the moisture evaporates. Add a pinch of baking soda for smoothness. Once the mixture is thick, the mawa is ready. Mawa or khoya is used in savoury and sweet dishes. It adds richness, thickness, texture and gives the dish a pleasant milky taste. A good source of calcium and vitamin D, promoting strong bones. High in calories and fat, mawa should be consumed in moderation.
Using good quality store-bought mawa speeds up the preparation process. Select mawa that is pale white, firm, without fungal growth or unusual smell. To make mawa at home, heat full-fat milk on medium heat until all the moisture evaporates. Add a pinch of baking soda for smoothness. Once the mixture is thick, the mawa is ready. Mawa or khoya is used in savoury and sweet dishes. It adds richness, thickness, texture and gives the dish a pleasant milky taste. A good source of calcium and vitamin D, promoting strong bones. High in calories and fat, mawa should be consumed in moderation.
Layered Mawa Gujiya or Karanji
(Yields 22)
Ingredients:
oil for deep frying
Filling
Ingredients:
500 grams mawa
1 cup unsweetened desiccated coconut
1/2 cup confectioner's sugar (icing sugar)
1/4 cup cashew nuts (chopped)
1/4 cup raisins
1/4 teaspoon cardamom powder
Method:
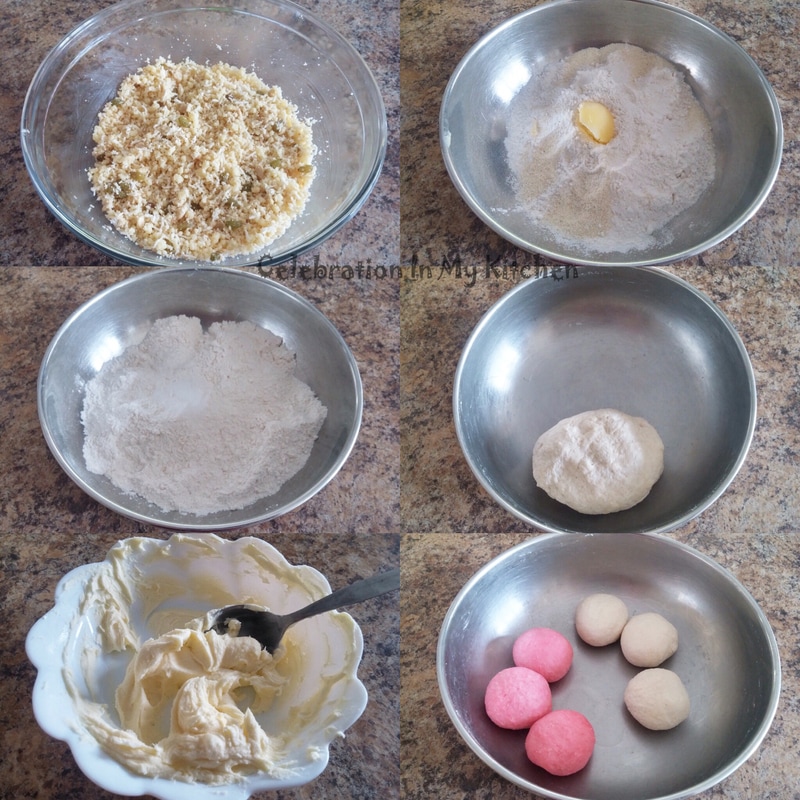
Grind mawa in a food processor till it resembles coarse breadcrumbs.
Heat a stainless steel skillet on medium flame and add mawa. Cook for a couple of minutes till fat starts to separates. Set aside to cool and if you see big lumps, try to break them down with your fingers.
Lightly dry roast coconut, mix with mawa. Cool mixture and then add sugar, cashew nuts, raisins and cardamom powder.
Note:
Paste (Sata or Satha)
Ingredients:
6 tablespoons ghee
6 tablespoons cornflour
Method:
In a bowl, cream the ghee and cornflour until light and fluffy. Set aside.
Dough
Ingredients:
1 3/4 cups all purpose flour or maida
1/4 cup rava or semolina
1 tablespoon ghee
3/4 cup water
15 drops red food colour
1/2 teaspoon salt
Method:
Sift the flour, mix in rava and thoroughly rub 1 tablespoon ghee with the mixture. Then add salt and water, knead into a stiff dough. Cover with a damp cheesecloth and rest for 30 minutes.
Divide dough into 2 equal portions. Colour one with the red food colour and divide into 3 equal balls. Similarly, divide the white dough into 3 equal balls.
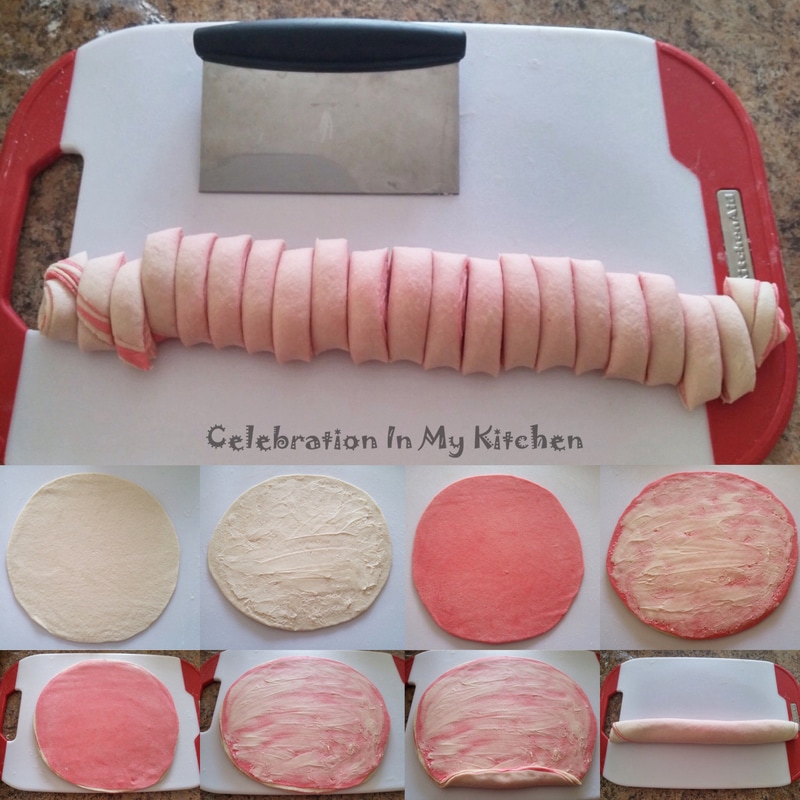
Dust some flour on a surface and with a rolling pin, roll each ball into a 6-inch or 7-inch circle. All 6 circles should be of the same size.
Spread 1 1/2 teaspoons of satha on top of a white circle. Place a red circle on top of the white. Now spread another 1 1/2 teaspoons of satha on top of the red one.
Continue the above alternating in colours with the rest of the circles utilizing all six on top of one another.
Gently roll the last circle to adhere all 6 layers and increase the size on all sides. Now you will have one big paratha.
Spread the remaining 2 teaspoons satha on top of the 6th circle and roll tightly to form a log. Roll and stretch until 12" long. Cut the log into 1/2" pieces.
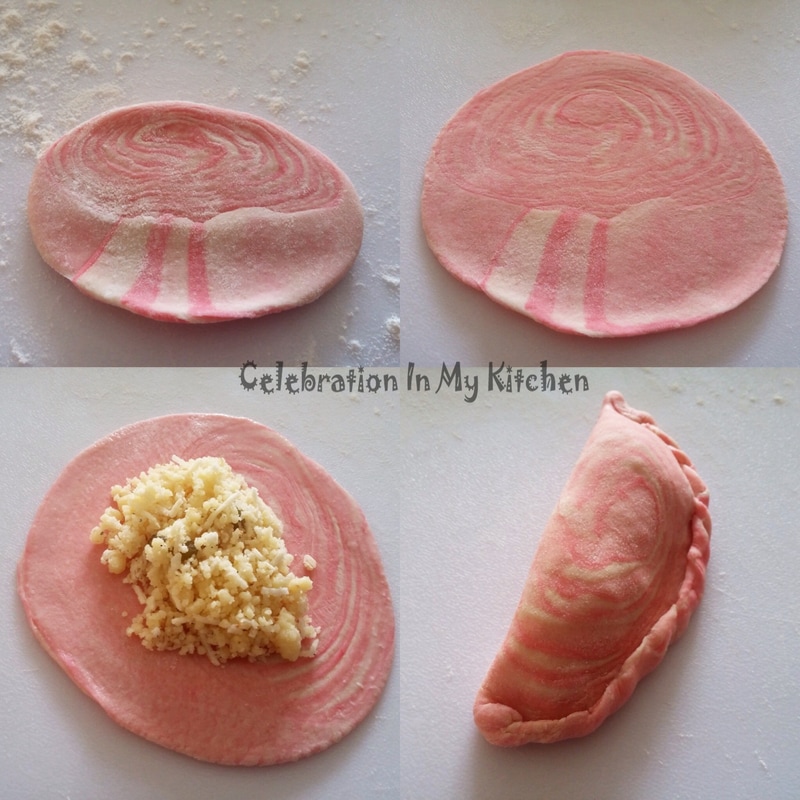
Dust some flour, press a coil at the side to move the layers at an angle (see last picture above), which will prevent the layers from opening up during frying. Roll into a 4 1/2 " circle and place 1 1/2 tablespoons of filling in the centre of the circle. Wet the edges with water and then fold on side to form a semi-circle and enclose
filling. Lightly press and seal edges. Create a pattern by twisting the edge of the dough inward or use tines of fork to press all around. Set aside and cover with a damp cheesecloth.
Continue the above with the remaining pieces.
Heat oil on low flame and deep fry 3 or 4 gujiyas at a time until crispy, colourful and flaky. Drain on absorbent paper towels. Do not brown them.
To bake, preheat oven to 400 F or 200 C. Place gujiyas in a baking sheet lined with parchment paper or silpat. Bake for 15 to 20 minutes until the edges start to brown. Overbaking will burn the crust and filling.
Cool and store in an airtight container.
Note:
(Yields 22)
Ingredients:
oil for deep frying
Filling
Ingredients:
500 grams mawa
1 cup unsweetened desiccated coconut
1/2 cup confectioner's sugar (icing sugar)
1/4 cup cashew nuts (chopped)
1/4 cup raisins
1/4 teaspoon cardamom powder
Method:
Grind mawa in a food processor till it resembles coarse breadcrumbs.
Heat a stainless steel skillet on medium flame and add mawa. Cook for a couple of minutes till fat starts to separates. Set aside to cool and if you see big lumps, try to break them down with your fingers.
Lightly dry roast coconut, mix with mawa. Cool mixture and then add sugar, cashew nuts, raisins and cardamom powder.
Note:
- Do not add sugar to the mawa when it is warm.
- I added minimal sugar and gujiyas were perfect in taste, not too sweet. Add sugar as desired.
Paste (Sata or Satha)
Ingredients:
6 tablespoons ghee
6 tablespoons cornflour
Method:
In a bowl, cream the ghee and cornflour until light and fluffy. Set aside.
Dough
Ingredients:
1 3/4 cups all purpose flour or maida
1/4 cup rava or semolina
1 tablespoon ghee
3/4 cup water
15 drops red food colour
1/2 teaspoon salt
Method:
Sift the flour, mix in rava and thoroughly rub 1 tablespoon ghee with the mixture. Then add salt and water, knead into a stiff dough. Cover with a damp cheesecloth and rest for 30 minutes.
Divide dough into 2 equal portions. Colour one with the red food colour and divide into 3 equal balls. Similarly, divide the white dough into 3 equal balls.
Dust some flour on a surface and with a rolling pin, roll each ball into a 6-inch or 7-inch circle. All 6 circles should be of the same size.
Spread 1 1/2 teaspoons of satha on top of a white circle. Place a red circle on top of the white. Now spread another 1 1/2 teaspoons of satha on top of the red one.
Continue the above alternating in colours with the rest of the circles utilizing all six on top of one another.
Gently roll the last circle to adhere all 6 layers and increase the size on all sides. Now you will have one big paratha.
Spread the remaining 2 teaspoons satha on top of the 6th circle and roll tightly to form a log. Roll and stretch until 12" long. Cut the log into 1/2" pieces.
Dust some flour, press a coil at the side to move the layers at an angle (see last picture above), which will prevent the layers from opening up during frying. Roll into a 4 1/2 " circle and place 1 1/2 tablespoons of filling in the centre of the circle. Wet the edges with water and then fold on side to form a semi-circle and enclose
filling. Lightly press and seal edges. Create a pattern by twisting the edge of the dough inward or use tines of fork to press all around. Set aside and cover with a damp cheesecloth.
Continue the above with the remaining pieces.
Heat oil on low flame and deep fry 3 or 4 gujiyas at a time until crispy, colourful and flaky. Drain on absorbent paper towels. Do not brown them.
To bake, preheat oven to 400 F or 200 C. Place gujiyas in a baking sheet lined with parchment paper or silpat. Bake for 15 to 20 minutes until the edges start to brown. Overbaking will burn the crust and filling.
Cool and store in an airtight container.
Note:
- At ever stage, ensure to cover dough, balls, pieces and raw gujiyas with a damp cloth.
- If you decide to bake the gujiyas, then the coil can be pressed with layers facing upwards, straight in the centre and not at a slant. See 5th picture above.
- Deep fry on low heat to maintain colours and achieve crispness.
- I fried few and baked the rest.

